Why Rip DVD to Plex Media Server?
Plex is a popular media server platform that allows users to organize and stream their digital media, including movies, TV shows, music, and photos. One of the common reasons why users intend to copy DVD to Plex server is to digitize their physical DVD movie collection and have access to their movies and TV shows on any device connected to the Plex server, including TV, Windows PC/Mac, iPad iPhone, etc.
After digitizing DVD movie collection, users can avoid the inconvenience of having to physically insert a DVD into a player every time they want to watch a movie. They can also have a digital copy of DVD movies stored on a hard drive, USB flash drive, NAS or in the cloud without the risk of physical damage or DVD disc rot.
Another major reason is that Plex pairs its streaming service with management feature, such as automatic metadata retrieval, transcoding, and remote access. By ripping DVD to Plex, users can take advantage of these features to make their DVD movie collection more accessible and enjoyable to use.
How to Rip DVD to Plex Media Server for Streaming/Storing
Plex Media Server supports a bounty of video formats and video codecs, including MP4, MKV, AVI, MOV, M4V, WMV, H.264, H.265, MPEG-4, and more. Therefore, you can choose ripping DVD to Plex MP4 or Plex MKV format based on your Plex client device and the version of the Plex media server you’re using.
Then try the below top DVD to Plex ripper to digitize your DVD movie collection to Plex server with little to no effort required.
WinX DVD Ripper Platinum
Reasons to use:
·Support both homemade and commercial protected DVDs.
·An expansive library of output formats supported.
·Rip and compress DVDs to smaller file size, less than 1GB.
·Clone DVD to ISO image and backup DVD main/full title at 1:1 quality ratio.
·Only 5 minutes to rip a full DVD to MP4 for Plex server.
The support of all DVDs gives WinX DVD Ripper Platinum a cutting edge in this domain. This top Plex DVD ripper can work well with CSS DVDs, regional DVDs, 99-title DVD, bad sector DVD, old/new DVDs, damaged DVDs, or workout/AV DVDs without any 3rd party program aids. Meanwhile, this toolkit gives you full freedom in output format selection. You can rip DVD to MP4, MKV, H264, HEVC, MOV, AVI, WMV, VOB, MPEG, copy DVD to ISO image or 1:1 backup DVD with main/full title if you want original DVD quality for Plex. What’s more, WinX DVD Ripper can easily rip DVDs to NAS Synology, QNAP, etc. for easy streaming or safe backup.
You’ll naturally gravitate to its powerful compression feature, as well. It can compress your DVD to HEVC or H264 codec, making 4GB file reduce to 1GB or less for saving storage room. Follow the below tutorial to rip DVDs to MP4 Plex format at level-3 GPU hardware accelerated 47X faster speed.
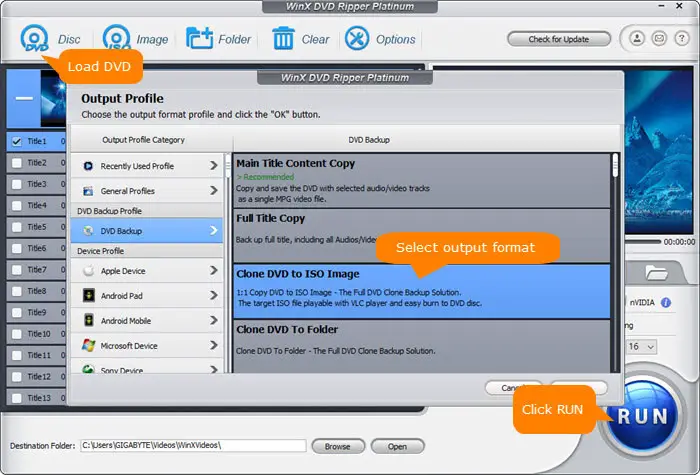
Step 1. Free download and install this feature-rich free DVD to Plex ripper on your Windows 10/11 or Mac. Launch it then and import the DVD resource you want to rip to Plex or NAS. It supports DVD disc, ISO image and Video_TS folder as input file.

Step 2. Choose MP4 (H264) as output format. An output format window will auto pop up after DVD loading and DVD title analysis are finished. Here you’re suggested to choose MP4 Video (h264+aac) as output format, since it delivers perfect balance among compatibility, quality and file size.
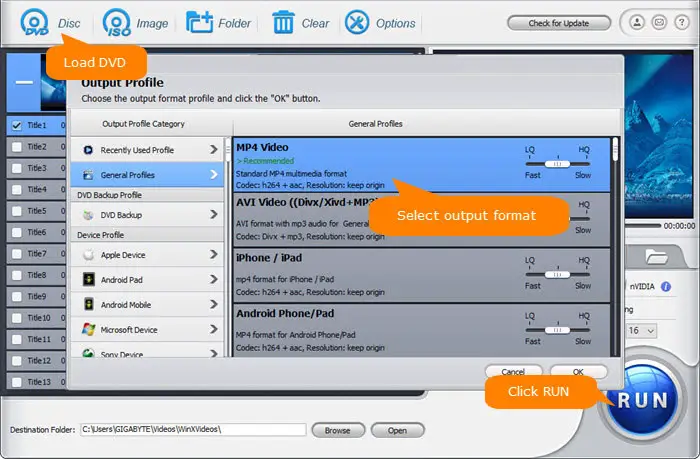
Generally, the size of your resulting MP4 digital copy of DVD will be properly compressed from 4GB to 1GB with 98% quality kept thanks to H264 codec high compression ratio and WinX built-in High Quality Engine. If you want 100% original quality copy of your DVD, you can head to DVD Backup profile and choose ISO image or backup mode as output format.
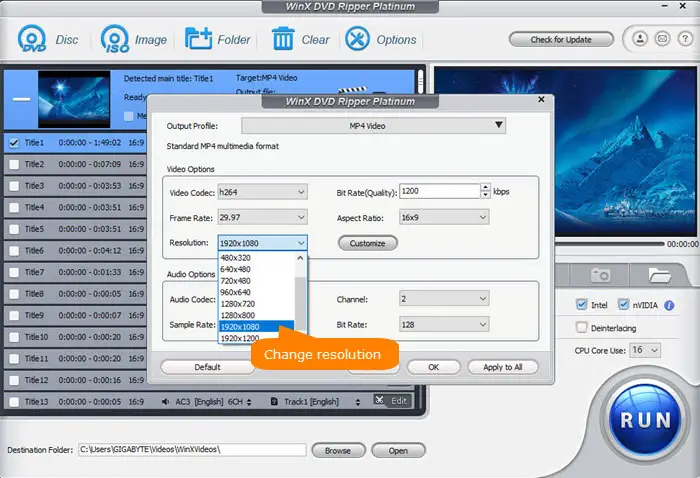
Optional: on top of the video codec and format for Plex, other parameter settings also matter a lot, including frame rate, resolution, etc. The recommended resolution for Plex is 1920×1080 or smaller and the video frame rate is 30FPS. Tap the Setting icon to adjust parameters to the recommended ones.
Step 3. Click the Destination Folder to set an output folder for the converted DVD movie. Then hit the RUN button to rip DVD to Plex at GPU accelerated speed. Minutes later, the DVD video will be saved in the destination folder in Plex best video format. Then you can add the ripped DVD movies to Plex media server.
On top of WinX DVD Ripper Platinum, there are other solid Plex DVD ripper programs to choose from. Top freeware Handbrake and Makemkv win the most votes, letting you digitize DVD movie collection to Plex server 100% free.
Handbrake
Reasons to use:
·100% Free to use.
·Provide a good balance between file size and video quality.
·Wide compatibility: compatible with Windows, Mac and Linux.
Handbrake is a free and open-source DVD ripper, able to rip DVD to Plex/NAS in MP4. This world-renown DVD to Plex server ripping software supports a variety of output presets for different devices and platforms, such as Apple devices, Android devices, and game consoles.
When ripping a DVD with Handbrake, you can choose the titles and chapters you want to rip and customize various video and audio settings, such as video codec, frame rate, and audio bitrate. Certainly, there is scarcely a man but has weakness. The big gripe about Handbrake is that it can’t handle encrypted DVDs unless you install libdvdcss library. That being said, it still can handle only region code DVDs and CSS protected DVDs. As for DVDs with advanced copy protection schemes like Sony ARccOS, Disney DRM, it’s powerless to render you help.
If you’re okay with this downside, Handbrake is still ideal for you to digitize DVD to Plex:
Step 1. Download and install Handbrake from the official website. Insert the DVD you want to rip to Plex.
Step 2. Launch Handbrake and tap the “Open Source” button to select the DVD as the source.
Handbrake will automatically scan the DVD and display a list of titles and chapters. Select the title you want to rip by checking the box next to it. You can also preview the title by clicking the “Preview” button.
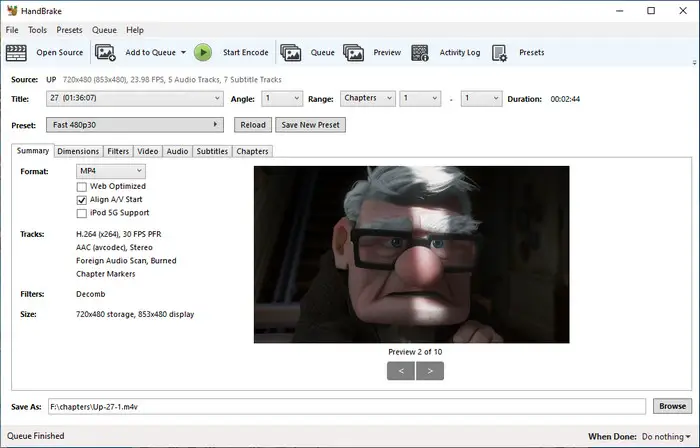
Step 3. Choose MP4 (H264) as output format. Afterwards, click the “Browse” button to select the folder where you want to save the ripped file.
Step 4. Configure the parameter settings for MP4 file if needed. Click the “Video” tab to adjust the video settings, such as the codec, bitrate, and frame rate. You can also adjust the audio settings and subtitles.
Step 5. Start ripping DVD to MP4. Click the “Start Encode” button to start the ripping process. The time it takes to complete the process will depend on the length of the title and your computer’s processing speed.
MakeMKV
Reasons to use:
·Easy to use.
·Free of charge
·High quality output: 1:1 digital MKV copy of DVD.
MakeMKV is exceptional at ripping DVD disc to an MKV file format without changing the video or audio quality. This means that you can enjoy the same high-quality content from your DVD on your Plex server without any loss of quality.
Its feature set is completed by the ability to rip region code DVDs and CSS DVDs without any extra party help. Similar to Handbrake, it will disappoint you if you feed it with Sony or Disney DVDs with advanced copy protection schemes. It’s not born for encrypted DVDs actually.
Overall, MakeMKV is a smart approach for general DVD discs and for high quality output after DVD to Plex ripping. If it’s just the one you’re looking for, you can give it a shot now:
Step 1. Free download and install MakeMKV. Once installed, insert your DVD into your computer’s DVD drive and launch MakeMKV. The software will automatically detect the DVD and display a list of titles to rip.
Step 2. When you insert a DVD into your computer’s DVD drive and launch MakeMKV, the software will automatically recognize your DVD disc and display a list of titles available for ripping. You can then select the title or titles you want to rip.

Be noted that MakeMKV only supports MKV as output format. That means the output MKV file can’t be streamed from Plex server to iPhone iPad, Apple TV, etc. Apple devices. Go back to the above 2 tools if you concern the final streaming devices a lot.
Step 3. Click on the “Make MKV” button. This free DVD ripper for Plex will start the ripping process, which may take some time depending on the size of the DVD and the speed of your computer’s DVD drive.
Once the ripping process is complete, you can add the ripped file to your Plex library by opening Plex and clicking the “Add Library” button. Select the folder where the ripped file is saved and follow the on-screen instructions to complete the process.
Once the ripping process is complete, you can segue to add the MKV files to your Plex library. Read on the following step-by-step tutorial if you are a newbie in this part.
How to Add DVD Movies to Plex Media Server?
Step 1. Run the Plex Media Server on your Windows PC/Mac, NAS, or others.
Step 2. Tap the Settings icon to activate setting options.
Step 3. Select Libraries under the Manage section. Afterwards, opt for Add Library > select the library type > name the library.
Step 4. Save your output DVD movie files in a folder and go back to Plex server.
Step 5. Select the Add folder. Click the “BROWSE FOR MEDIA FOLDER” button > choose the movie folder > tap ADD and finish the steps Plex shows.
After DVD digital copy adding to Plex server, you can eventually enjoy them on any device connected to your Plex Media Server without time or geographical limits.