If you have mastered the art of cutting and merging scenes, learned to work with audio and titles on a basic level, it might be time to step up your video editing game and learn a few tricks that will improve the way your movies look on the viewer’s screens.
In this post, we’ll show you 5 easy post-production tricks you can use in your project. Some of them are great for intros and teasing trailers, others – can be useful throughout the entire video. To apply these effects, we’ll be using free video editing software for Windows, named VSDC. If you’re on Mac, you can recreate most of them in iMovie – it’s also free and available to every Apple user.
Cinematic widescreen bars
The reason why black bars (or mattes) are instantly associated with a Hollywood movie is simple. Since most movies are shot with a widescreen aspect ratio and watched in standard-width video formats, the image receives black bars automatically in order to preserve the original ratio and prevent quality loss. In the cinema industry, the result is called letterboxing.
Interestingly, these days some video editing enthusiasts intentionally add black bars to their videos to create the illusion of a letterboxed image. Technically, there are two ways to do it. First, you can use a widescreen aspect ratio camera for shooting and then convert the result into a standard-width format. For example, 16:9 to 4:3. The second way typically involves masking tools – you’ll find these in video guides for Adobe Premiere.
VSDC offers an easier and a faster way to create black bars. It shouldn’t take you more than a minute. This video editor allows you to add graphic objects, such as circles and rectangles, to the scene and change their shape and color. Thus, to create a widescreen bars effect, all you need is add a rectangle, stretch it to the width of your video, apply black color and duplicate it, so that your top and bottom bars would look 100% identical.
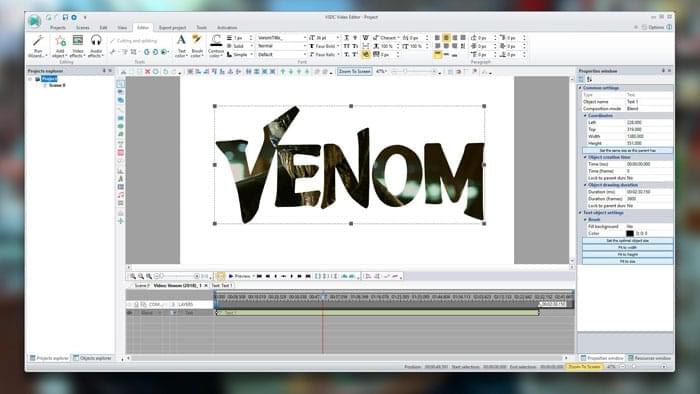
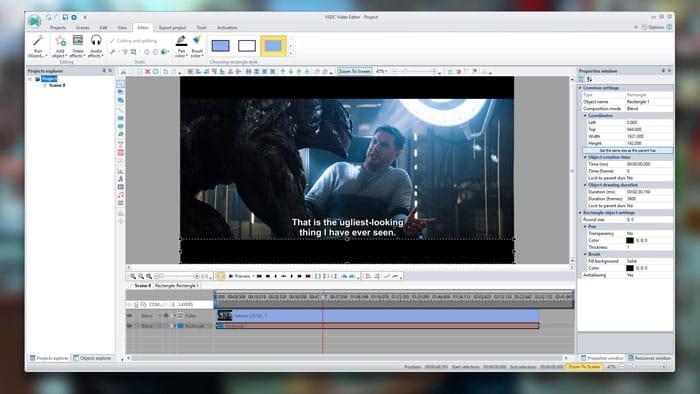
Video playing inside text (see-through movie titles)
This effect is wildly popular among filmmakers. It’s typically used for the opening titles, whereas the key point is having transparent letters and playing a video inside them. Sometimes this effect is referred to as a text mask because most video editing software offers to use a clipping mask for achieving it. However, VSDC offers an easier approach.
To create a video-inside-text scene, add a text object and format it according to your idea. You can adjust text size, alignment, thickness, style, and everything in between. Once you’ve achieved the right look, double-click on the text layer on the timeline and add a video file to the scene. Stretch it to cover the entire text object. After you’re done with the positioning, go to “Blend” dropdown menu and choose “Source in” mode. That’s all it takes.
Keep in mind that the video editor will offer you text formats based on the ones you have installed on your PC. So, if you’d like to use fancy lettering – even the one used in your favorite movie – you can do that. Designshack has a great selection of free font directories, or you can just google any particular one and install it on your computer before starting the video project.

Split screen
There are so many ways to create a split screen, and so many purposes to apply it in the movie – we can’t recommend this effect enough for beginning filmmakers to master. It’s used for showing the “before-and-after” effect, the “expectations-and-reality” effect, the “meanwhile here is what’s happening somewhere else” effect and much more.
And if you’re a movie fan like us, you probably know split screens have been introduced in cinematography way before we got all the modern video editing software. In fact, Pillow Talk produced in 1959 has ten split screen scenes illustrating phone conversations between two people. At the beginning of the modern century, split screens have been used much more often. Kill Bill, 500 Days of Summer, The Rules of Attraction, and Requiem for a Dream are just some examples.
If you have a plot idea that could be perfect for a split screen effect, you can easily implement it in VSDC. Given it’s a non-linear video editor, you’re able to add several videos in the same scene and thus, “split” the screen into as many parts as needed. Simply add video files to the timeline and place them below each other, so that the playback would be simultaneous. Then, adjust the size and the position of each video file on the workspace.
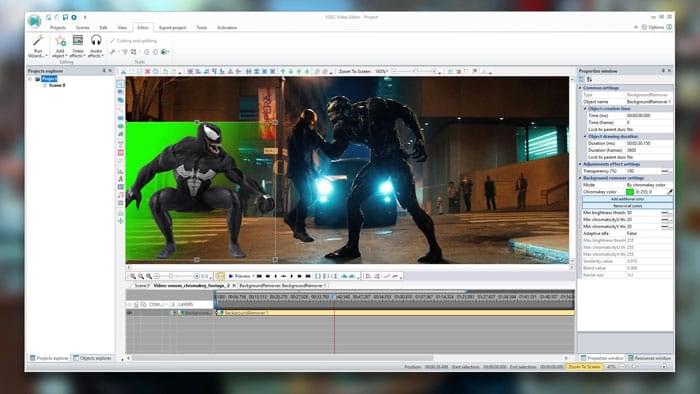
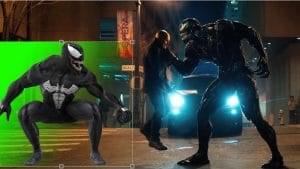
Green screen effect (Chroma Key)
You’ve surely heard about Chroma Key and perhaps even used this tool to replace your video background. What we encourage you to try is to think of other creative ways to apply it. For example, instead of using green screen for the background of your video, you can replace green color on any object in the scene.
The Chroma Key magic is capable of making any green-colored object look “transparent” or, if that’s the purpose, replace it with another one. The examples are numerous. Mirror reflections and mobile/TV screens can be created from scratch as long as they are green, views from the window can be faked, and you may even want to experiment with pieces of clothes – to make them transparent or replace their design.
Chroma keying a fragment isn’t too different from keying the entire background. First, you add the background image or a video that should be seen through the replaced area. Second, you add the creative that contains a green fragment and apply the background remover effect to it. The green screen software will automatically identify the color tone that needs to be removed. This area will become transparent, so that whatever is in the background will be seen-through.
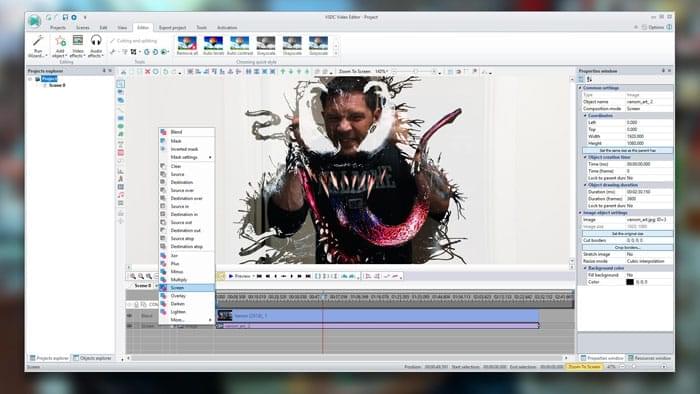
Double exposure
The last effect we’re talking about is called double exposure and it may look very impressive. It’s often used in photography, but you can often see it in movies and music clips. The idea behind double exposure is blending two images into one beautiful combination. You can see double exposure during the True Detective opening, on the official poster of Enemy with Jake Gyllenhaal, and even in Hitchcock movies!
Although looking quite advanced, double exposure is easy to recreate in VSDC Free Video Editor and other non-linear video editors. The way you achieve it is by placing two videos you want to combine into a composition and using the “Screen” blending mode on one of them. You might want to experiment with the level of transparency, with the color style, and the backgrounds (it’s a good idea to have at least one video with a transparent background) but the essence of this effect is on the surface, and there is no need in any special knowledge or experience.
To recreate all these effects, you’ll need to download VSDC. It’s absolutely free and doesn’t place any watermarks on your videos after exporting. And if any of these descriptions are insufficient, you can also browse their channel on YouTube, as it contains video instructions on how to apply each setting.

I love video editing…