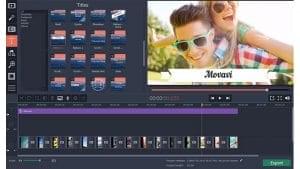
Many people keep a video camera on hand to record important moments in the family, at work or with the friends. Once you record the video, you may think of wanting to publish it on the web to share with others. Before publishing your video on the web, it is recommended that you edit the mistakes that you make during the shooting process. Flaws in your video can be edited with a basic video editor like Movavi Video Editor.
The first step is to launch your Movavi Video Editor and load the video that need to be edited. You are to click on the Add Media Files button which is located above the timeline panel and select the preferred video file to load it onto the timeline. To the right, you will see a preview screen where you can play back your video. As the video is being played back, the red marker will also move.
The red marker function is used mainly for selecting a part in the video. For example, if you found an unnecessary part in the video, you can drag the red marker to select it and then click on the scissor button to cut it. The scissor tool is useful for trimming silence part in the beginning, end or anywhere in between the video.
If you find the video edge has issue, you can press the crop button to bring up the crop tool. A crop frame will appear and you are to adjust the frame until the edge that has distracting issue is outside. After that, you just press the apply button and your video will be cropped. Cropping a video allows you to change the emphasis you want to make in the video. It is also useful for reducing a video resolution to fit in a certain area.
The rotate tool can rotate a video by 90 degree each time. You must select the video that you want to change the orientation and click on the rotate button to rotate it. The rotate tool is handy when you shoot a video in the wrong orientation on your mobile phone. This can happen when your phone did not quickly rotate to its orientation when when you are capturing the video.
It can also happen when you accidentally rotate the phone during the video shooting process. In this situation, you will have to use the scissor tool to first trim the part where you accidentally rotate the phone before using the rotate button to rotate it to the right orientation.
The video editing software allows you to add transition to your video in the timeline. Under Video Transition tab, you can drag any transition you like onto the space in between the two clips in the timeline. Using a simple cut transition like cross and dissolve, you can prevent your visitors from getting distracted from the important message in the video.
The timeline panel also support adding audio clip to your video. Adding music to the video is important if you want to share it on social media site like YouTube. It gives your video a better chance to compete with other videos that are also ranking on YouTube. Music perks up the mood of the viewers and encourage them to stay longer in watching the video.
If your video don’t have any background music, you can just drag a song file onto the audio track. The audio track on the timeline can support unlimited audio clips. The audio clip will play in the sequence it is arranged. If you want a song play first, you just drag it to before the other song in the timeline.
You can copy and paste the same audio track so that it will automatically repeat over the entire length of the video. If you need to adjust the audio track volume, you can click on the gearwheel to go to audio properties and drag the volume slider to the right. If the audio track is too long, you can drag the red marker to the point where you want to cut and use a scissor tool to trim it.

